These quick guides are aimed at EBA Next Administrators who already have some experience with similar systems or are EBA Next Enterprise users.
More detailed instructions can be found further down in the software by clicking on the Help button.
Installation Overview
1. Overview
This guide explains how EBA Next system works and how to successfully implement it.
2. Terminology
List of commonly used terms:
- EBA Next - Advanced content & document management software
- Send/receive function - function that is set up for specific data - billing info - send EBA Next system’s users count, content reception and sending, time functions, scripting tasks, etc.
- Agency(test and production) - server for billing info
- Meta data - structured data that describe, explain, locate and in some other way facilitate management resources
- Web client - GUI for users (frontend)
- (Next) Admin - App for setting up EBA Next
- Services - EBA Next application services (backend)
- Developer - IDE tool for developers
- Ebaautomation - background app for task automation
- Scriptworker - background app for executing scripts
3. EBA Next Components
EBA Next System’s components are divided into 3 sections:
3.1 EBA Next Server
EBA Next Server components are group of an application services to serve and process content. Services are divided by their function:
-
EBA mobile service
Serves GUI, fronted<>backend connections, database connections, share portal
-
EBA scheduler service
Automation tasks, time rule tasks, script task, exchange tasks
-
EBA messenger service
Notifications, sending content
-
EBA SQL queue service
Counts content, marks new content
-
EBA Webserver service
Exposes selected content via WebServices (REST,API)
-
EBA Exchange service
Exchange content via AS2 protocol
Each service is configured via ini configuration file. Upon running EBA Next server installer all services are installed. However there is no need to run them all if there is certain functionalities are not needed. Most common used services are: mobile, scheduler, messenger and sql queue.
3.2 EBA Next Edge Apps
EBA Next Edge Apps are group of applications for different needs such as administering the system, connecting to local computer’s resources, tool for developing custom scripts etc.
Here is full list of Next Edge Apps:
-
EBA Next Admin
Tools for administrators to setup and change settings of EBA Next System. This tool is needed only for administrators.
-
EBA Next Connector
Tool to connect local PC assets to EBA Next system such as:
-
local scanner (only twain driver is supported)
-
local PC resources to perform OCR on content
-
local certificate store
-
Integration with MS/Libre Office
-
Attachment auto update feature
Features are described in respective chapters.
-
-
EBA Next Legacy
COM integrations (only on Windows platform). Needed for some integrations via COM.
-
EBA Next Developer
IDE for developers
Each app can be separately installed or removed via installer.
3.3 Database
EBA Next system stores all content and settings into database. Supported database formats are Postgres SQL, Microsoft SQL and Oracle.
System requires (at least) two separate databases: one for settings and one for content. You can add as many databases for content as you like. For example, you can have each year’s content in separate database.
4. Architecture of EBA Next
Here is architecture of EBA Next system in schema view:

Disclaimer: The ports shown in this diagram are provided as examples and represent a typical configuration. Actual port numbers and communication flows may vary depending on the specific network setup, security policies, and infrastructure of each organization. Please consult your system administrator or IT provider to confirm the appropriate port configuration for your environment.
5. EBA Next installation package
EBA Next contains 2 installer packages:
- EBA Next Server
- EBA Next Edge Apps
Installation Overview
This guide explains how the EBA Next system works and how to successfully implement it.
-
Database Preparation
Create two separate databases:
- One for settings
- One for content
-
Installation
Install EBA Next Server and Next Apps.
-
Database Connection Configuration
- Open the folder
%ProgramData% - Find and open the file
ebaservices.ini - Add the connection string for the settings database
- Open the folder
-
Connection Testing
-
Open CMD as administrator
-
Navigate to
C:\Program Files\EBA Next Server\bin -
Run the command:
ebaautomation4.exe -testconnection
Run this command to test the database connection.
If there are errors, please fix them before continuing.
The issue is likely inebaservices.ini. -
-
Database Update
Run:
ebaautomation4.exe -updatedbIf the process completes successfully, proceed to the next step.
Otherwise, check for displayed errors.
-
HTTPS Certificate Import
Run:
ebaautomation4.exe -installhttpscert /path/to/certThe certificate’s ID will be automatically written into
ebamobileservice.ini.
-
Proxy Password Reset
Run:
ebaautomation4.exe -proxypassword resetSave the reset password — you will need it later.
The password hash will also be written inebamobileservice.ini.
-
Additional Configuration (
ebamobileservice.ini)-
Open the file in
%ProgramData% -
Add or verify the following entries:
internalHostname = [server name or IP address]
mobileHttpsPort = [service port]
The
sslcertandproxyentries should already be set automatically.
Other entries are optional and commented out. -
-
Service Start
- Open Services
- Start the EBA Next Mobile Service
- Setting up Connection in EBA Next Admin
-
Open EBA Next Admin
-
Click the menu icon (top right)
-
Create a new connection:
UrlServerAddress = [server_name]:[port] password = [proxy password] -
Test the connection (Test connection)
- Company Registration and First Login
- Defining the Content Database in Next Admin
- In the admin interface, go to Shards
- Add the connection to the content database
1.3 Post Installation Steps
1. Overview
This quick guide shows you how to implement EBA Next system into an organization.
2. Prerequisites
- Contract agreement for EBA Next
- Users and workplaces
- Workflow for processes to be implemented
- Server
- SQL database
- SSL and Qualified Certificates
3. Implementation of EBA Next in steps
3.1 Contract agreement for EBA Next
3.2 Prepare server and database
3.3 Create test environment for EBA Next
3.4 Install EBA Next in test environment
3.5 Define Document models and metadata
3.6 Setup organization schema and users in EBA Next
3.7 Enter workflow rules
3.8 Extensive testing
3.9 Transfer settings to production environment
3.10 Start using EBA Next in production.
Next Server Install Guides
1. Overview
This quick guide shows how to install EBA Next Server on Windows server.
Same procedure is for updating the EBA Next Server.
2. Prerequisites
- Windows server 2016 or newer.
- EBA Next msi installer.
- Database
- Administrator privileges
Notice
Always install into the testing environment! Do not install or update straight into production before extensive checkup and testing on your local test environment.
3. EBA Next Server Installation
Obtain installer from your licensed EBA partner.
3.1 Open the .msi installer for EBA Next Server.

3.2 Follow the installation instructions to install the EBA Next Server.
3.3 When installed, click Finish.
Video
See animation below for demonstration of installing the EBA Next server:

1. Overview
This quick guide shows how to connect to a shard database in EBA Next Admin.
Supported database types:
- Postgres SQL 12 or newer.
- MS SQL 2016 or newer.
- Oracle 12 or newer.
2. Connect Shard database to EBA Next Admin
- When you open EBA Next Admin you will be in Common view. There you will select Shards under Sharding.
- Click on Add and enter connection name

- You will then select the connection and fill out the database connections.

- At the bottom of the page you will also need to set Connection id, after that click on apply.

- After filling out the settings change the Status to Active.

1. Overview
This quick guide shows how to install EBA Next System on Linux server.
2. Prerequisites
- Linux CentOS 9 server
- EBA Next NEXT rpm installer
- User with sudo permissions
- Internet connectivity
- Updated packages
3. Install required packages
Perform all actions with sudo or as root.
Run following commands to prepare environment to install EBA Next:
3.1 Enable CRB
dnf config-manager --set-enabled crb
3.2 Install EPEL
dnf -y install epel-release epel-next-release
3.3 Enable OpenSSL Legacy policy
update-crypto-policies --set LEGACY
3.4 Install text editor and wget
dnf -y install vim wget
4. Install Application Services
4.1 Download installer:
wget path-to-installer
4.2 Run installer:
dnf -y install ebadmsnextserver-X.X.X-XXXXX.x86_64.rpm
4.3 Update dynamic linker cache
Run command:
ldconfig
4.4 Install services, run for each service needed:
/usr/local/bin/ebaservice -i
Use -u operator for uninstall.
Example:
/usr/local/bin/ebamobileservice -i
- ebamobileservice - serves as user GUI, exchanges all data to and from DB, connection to DB via Next Admin.
- ebasqlservice - counts documents and marks them read/unread.
- ebamessengerservice - sends notifications, used for sending documents from system
- ebaschedulersettings - triggers send/receive on interval, sends licenses data, runs scripts in background
- ebawsservice - runs Web Service server for integrations
4.5 Reload Daemon
Execute command:
systemctl daemon-reload
4.6 Enable services
systemctl enable ebamobileservice
Do the same for all services needed.
5. Connect Services to Database
Database parameters are stored in ebaservices.ini file.
Open file with text editor and set parameters:
vi /etc/ebanext/ebaservices.ini
6. Opening firewall ports
Open port on firewall for EBA services:
Example for firewalld:
firewall-cmd --permanent --add-port=433/tcp
Restart firewall
sudo firewall-cmd --reload
See all open ports:
sudo firewall-cmd --list-all
Check if port is opened or content is served:
telnet 127.0.0.1 433
curl -i http://127.0.0.1:433
7. Set SSL certificate for Mobile Service
Run command:
export QT_QPA_PLATFORM=offscreen
You can add this command to your bash profile for later use.
To import SSL certificate run command:
/usr/local/bin/ebaautomation4 -installhttpscert /path/to/ssl_cert
Enter certificate’s password.
8. Config files & log files
Config files are stored in folder /etc/ebanext
Log files are stored in folder /ebatrafic/
9. Troubleshooting
9.1 Use eps script to reveal running EBA services:
eps
OR locate installed services:
locate ebasettingsservice
9.2 Check status of service:
systemctl status ebaservice-name
Example:
systemctl status ebamobileservice
9.3 Check journalctl for detailed systemd log:
sudo journalctl -xe
9.4 Restart service
systemctl stop ebaservice-name
Examples:
systemctl stop ebasqlqueueservice ; systemctl start ebasqlqueueservice
systemctl stop ebamessengerservice; systemctl start ebamessengerservice
systemctl stop ebaschedulerservice; systemctl start ebaschedulerservice
systemctl stop ebafirewallservice ; systemctl start ebafirewallservice
systemctl stop ebasettingsservice ; systemctl start ebasettingsservice
systemctl stop ebamobileservice   ; systemctl start ebamobileservice
systemctl stop ebawsservice 	  ; systemctl start ebawsservice
systemctl stop ebaexchangeservice ; systemctl start ebaexchangeservice
9.5 Enable Debug log for QT
sudo sed -E -i "s/(\*\.debug\=)false/\1true/" /usr/share/qt5/qtlogging.ini
9.6 Oracle drivers
Don’t forget to install Oracle drivers if you need to connect to Oracle DB.
wget https://download.eba.si/nightly/linux/centos9/oracle-instantclient-basic-21.8.0.0.0-1.el8.x86_64.rpm
9.7 Download log file from CMD to your device
Zip log file:
tar cvzf ~/logname.tar.gz log_file
Download zipped log file to your device:
scp eba@hostname:logname.tar.gz logname.tar.gz
9.8 Error while executing DNF update:
System requires libQt5Sql.so.5(Qt_5.15.3_PRIVATE_API)(64bit), but none of the providers can be installed
Run update with –allowersing option:
sudo dnf update --allowerasing
1. Overview
This quick guide shows how to install EBA Next Server on Windows Subsystem for Linux.
2. Prerequisites
- Windows server 2016 or newer.
- EBA Next NEXT msi installer.
Notice
Always install into the testing environment! Do not install or update straight into production before extensive checkup and testing on your local test environment.
3. Install Ubuntu into WSL
3.1 Open the start menu search and look for Windows features on or off.

3.2 Check Virtual Machine Platform and Windows Subsystem for Linux.

3.3 The computer will restart after clicking OK.
3.4 In File Explorer a new folder Linux has been created.
3.5 Open Command Prompt with administrative privileges and type wsl. We can see there aren’t any distributions installed for WSL yet.
3.6 Type wsl --update do install wsl on your computer.

3.7 Type wsl --list --online to see valid distributions that can be installed. The latest one is recommended.

3.8 Type wsl --install -d and name of distribution. For example we use Ubuntu 24.04 distro: wsl --install -d Ubuntu-24.04.

3.9 The WSL is ready to use.
4. EBA Next Server Installation
Obtain installer from your licensed EBA partner.
4.1 Navigate to the directory where you want to download EBA Next.
4.2 Follow the Next Server - Linux Install Guide to proceed.
1. Overview
This quick guide shows how to install EBA Next Server in docker.
2. Prerequisites
- Linux server
- Docker installed
- Administrator privileges
Notice
Always install into the testing environment! Do not install or update straight into production before extensive checkup and testing on your local test environment.
3. EBA Next Server Installation
3.1 Create a folder in which you will have docker-compose file
example of docker-compose file:
version: 0.1
services:
  ebaexchangeservice:
    image: gitlab.eba.si:5050/eba/eba-dms-next/ebanextservices:latest
    container_name: ebaexchange
    environment:
      - SERVICE_NAME=ebaexchangeservice
    volumes:
      - ebainis:/etc/ebanext
      - ebalogs:/ebatraffic
    networks:
      - eba-prod

  ebamessengerservice:
    image: gitlab.eba.si:5050/eba/eba-dms-next/ebanextservices:latest
    container_name: ebamessanger
    environment:
      - SERVICE_NAME=ebamessengerservice
    volumes:
      - ebainis:/etc/ebanext
      - ebalogs:/ebatraffic
    networks:
      - eba-prod

  ebamobileservice:
    image: gitlab.eba.si:5050/eba/eba-dms-next/ebanextservices:latest
    container_name: ebamobile
    environment:
      - SERVICE_NAME=ebamobileservice
    ports:
      - 443:8443
    volumes:
      - ebainis:/etc/ebanext
      - ebalogs:/ebatraffic
    networks:
      - eba-prod

  ebaschedulerservice:
    image: gitlab.eba.si:5050/eba/eba-dms-next/ebanextservices:latest
    container_name: ebascheduler
    environment:
      - SERVICE_NAME=ebaschedulerservice
    volumes:
      - ebainis:/etc/ebanext
      - ebalogs:/ebatraffic
    networks:
      - eba-prod

  ebasqlqueueservice:
    image: gitlab.eba.si:5050/eba/eba-dms-next/ebanextservices:latest
    container_name: ebasqlqueue
    environment:
      - SERVICE_NAME=ebasqlqueueservice
    volumes:
      - ebainis:/etc/ebanext
      - ebalogs:/ebatraffic
    networks:
      - eba-prod

  ebawsservice:
    image: gitlab.eba.si:5050/eba/eba-dms-next/ebanextservices:latest
    container_name: ebaws
    environment:
      - SERVICE_NAME=ebawsservice
    ports:
      - 9877:9877
    # expose:
      # - 7000
    volumes:
      - ebainis:/etc/ebanext
      - ebalogs:/ebatraffic
    networks:
      - eba-prod

volumes:
  ebainis:
    driver: local
    driver_opts:
       o: bind
       type: none
       device: /etc/ebanext
  ebalogs:
    driver: local
    driver_opts:
       o: bind
       type: none
       device: /ebatraffic

networks:
  eba-prod:
    driver: bridge
3.2 In this folder create two folders named inis and ebatraffic
3.3 Open inis and create .ini files for all services.

3.4 Run the docker-compose file with the command docker-compose up -d and go inside the docker with the command docker exec -it ebamobile bash
3.5. Once inside the docker go to /etc/ebanext and modify the .ini files and connect them to database
3.6 In EBA Next Admin create a connection to the database
1. Overview
This quick guide shows how to prepare a SQL database for EBA Next system.
IMPORTANT: Each EBA Next System requires at least two (2) databases - one for settings and (at least) one shard database for content. S
Supported database types:
- Postgres SQL 12 or newer.
- MS SQL 2016 or newer.
- Oracle 12 or newer.
2. Common procedures for all database types
- SQL user to connect to database with r/w rights. Preferably role database owner.
- Enough resources regarding users number. See system requirements.
- Enough disk space to write content. See system requirements.
- Allow ebamobliservice to connect to sql server
4. Configure MS SQL database
4.1 Create SQL user
Create MS SQL user using SQL authentication and not Windows. Set default language for this user to English.
4.2 Set collation
Set Collation on: “Language_CI_AS”. Collation must have CI – character insensitive.
4.3 Prevent deadlocks
Before use of newly created database execute SQL queries below as database administrator (sa):
ALTER DATABASE MyDatabase SET ALLOW_SNAPSHOT_ISOLATION ON
ALTER DATABASE MyDatabase SET READ_COMMITTED_SNAPSHOT ON
Replace “MyDatabase” with actual EBA Next database name.
SQL queries must not be executed simultaneously(execute one and when its done start the other one), and must be executed on each database in case you are using more databases for EBA Next.
4.4 Enable document locking
To enable the document locking two SQL queries must be executed, and must not be executed simultaneously:
USE master GRANT VIEW SERVER STATE TO SqlUser
Replace “SqlUser” with actual sql user which uses EBA Next database. Execute SQL queries as a user with access to master database (sa).
4.5 Prevent large log files
MS SQL server by default records very detailed data in the log files. That means that log files become large and occupy a lot of disc space. To avoid this situation set database log option to “simple”. This can also be done by executing SQL query:
ALTER DATABASE YourDatabaseName SET RECOVERY SIMPLE
Replace “YourDatabaseName” with actual database name for EBA Next.
4.6 Install FTS module
Install FTS module on SQL server.
FTS Module
MS SQL Server FTS represents one of the modules in Microsoft SQL Server that specializes in indexing and querying unstructured textual data stored in a Microsoft SQL Server database.
Before performing a full-text query on full-text data, these data must first be indexed using a process that performs full-text data indexing.
Enabling FTS on the EBA DMS Database
The following procedure enables Full-Text Search (FTS) on the EBA DMS database:
- First, install the FTS module on the server.
- Then, execute the following queries:
Microsoft SQL
First, the database administrators must enable the FTS module on the database. Once it is enabled, the following queries are executed one by one:
exec sp_fulltext_database 'enable'
create unique index eba_fts_texts_idx on eba_fts (id)
create unique index eba_fts_a_texts_idx on eba_fts_a (id)
create unique index eba_abfts_idx on eba_addressbook_fts (id)
create unique index eba_abfts_script_idx on eba_addressbook_script_fts (id)

create fulltext index on eba_fts (texts) key index eba_fts_texts_idx on ftsEBA
create fulltext index on eba_fts_a (texts) key index eba_fts_a_texts_idx on ftsEBA
create fulltext index on eba_addressbook_fts (texts, extern_id) key index eba_abfts_idx on ftsEBA
create fulltext index on eba_addressbook_script_fts (texts) key index eba_abfts_script_idx on ftsEBA
Testing FTS Functionality
You can test the operation of FTS with the following queries:
select id from eba_fts where contains(texts, ‘“pogo*”’)
select id, texts from eba_fts where contains(texts, ‘k%’)
4.7 Linux Only: install Linux MSSQL ODBC driver
We need to install MSSQL drivers to successfully connect to MSSQL database from Linux system. This is necessary step regardless if it is main database or if we want to connect to external database.
See official Microsoft Learn page: https://learn.microsoft.com/en-us/sql/connect/odbc/linux-mac/installing-the-microsoft-odbc-driver-for-sql-server?view=sql-server-ver16&tabs=redhat18-install%2Calpine17-install%2Cdebian8-install%2Credhat7-13-install%2Crhel7-offline
Example for CentOS/Rocky Linux installation (for Ubuntu check link above):
4.7.1 Run in terminal to set latest package version:
if ! [[ "7 8 9" == *"$(grep VERSION_ID /etc/os-release | cut -d '"' -f 2 | cut -d '.' -f 1)"* ]]; then echo "RHEL $(grep VERSION_ID /etc/os-release | cut -d '"' -f 2 | cut -d '.' -f 1) is not currently supported."; exit; fi
4.7.2 Download latest package:
curl -sSL -O https://packages.microsoft.com/config/rhel/$(grep VERSION_ID /etc/os-release | cut -d '"' -f 2 | cut -d '.' -f 1)/packages-microsoft-prod.rpm
4.7.3 Install package:
dnf install packages-microsoft-prod.rpm
4.7.4 Install driver:
ACCEPT_EULA=Y dnf install -y msodbcsql18 –check correct version prior executing command
4.7.5 Set environments in env.txt:
- Open /etc/ebadmsnext/env.txt with text editor (example
vi /etc/ebadmsnext/env.txt)- Add following lines:
EBA_MSSQL_CONNECT_DRIVER=/opt/microsoft/msodbcsql18/lib64/libmsodbcsql-18.4.so.1.1–check for correct path and version!EBA_MSSQL_CONNECT_STRING=DRIVER={/opt/microsoft/msodbcsql18/lib64/libmsodbcsql-18.4.so.1.1};SERVER=$SERVER;Encrypt=no;DATABASE=$DATABASE–check for correct path and version!
- Add following lines:
5. Configure Oracle SQL database
5.1 Request Oracle drivers from Licensed partner.
5.2 Extract drivers into bin subfolder of EBA Next Edge Apps installation. Do the same for EBA application services, extract drivers into bin subfolder.
5.3 In ebaservices.ini set connection to database copying whole connection string from tnsnames.ora file.
5.4 Execute following queries on instance:
GRANT SELECT ON VIEW $V_SESSION;
GRANT EXECUTE ON SYS.DBMS_CRYPTO TO <EBA_DB_USER>;
GRANT CREATE SEQUENCE TO <EBA_DB_USER>;
You need to extract drivers for every client, who wants to connect to Oracle database.
1. Overview
This quick guide shows how to setup EBA Next services for use.
Each service has it own settings set by configuration (.ini) file.
An ‘.ini’ files are configuration files that define various settings for different services. Each of these ‘.ini’ files contains parameters and options that control the behavior of the associated service. Here’s a breakdown of what each of these services represents.
Configuration files location:
- Windows: C:\Programdata\EBANext
- Linux: /etc/ebanext/
Note: Always open ini files in text editor with elevated (admin) rights.
2. Prerequisites
- Installed EBA Next Server
- SQL database prepared - PostgreSQL, MS SQL or Oracle.
- SSL certificate
3. Services descriptions
- ebamobileservice - serves as user GUI, exchanges all data to and from DB, connection to DB via Next Edge Apps.
- ebasqlservice - counts documents and marks them read/unread.
- ebamessengerservice - notifications and sending documents via internal mail server
- ebaschedulersettings - triggers send/receive on interval, sends licenses data, runs scheduled scripts or tasks in background
- ebawsservice - runs Web Service server for API integrations
4. Setup Database Connection and creating tables
Connection between services and SQL database is set in ebaservices.ini file.
NOTE: Open text editor with admin privileges to edit and save settings.
- dbType: database type (postgresql, mysql, oracle, virga).
- dbName: name of your database.
- host: IP of your database.
- port: port where connection with database is.
- username: SQL user username
- password: SQL user’s password
Note: after the first successful connection, the password is encrypted and is no longer visible.
4.2 Example of .ini file
Here is the demonstration of an ebaservices.ini file:

Creating tables:
- On Windows:
- Navigate to C:\Program Files\EBA Next Server\bin
- First run command
ebaautomation4.exe -testconnection- to check if ini file can connect to the database - Then run command :
ebaautomation4.exe -updatedb- to create database tables
4.3 Demonstrating video
Here is the video showing how to access ebaservices.ini on Windows system.

5. Setup EBA Mobile Service
EBA Mobile Service is essential service to setup the system and launch user GUI. It is possible to launch the service in HTTP or HTTPS mode but we recommend using HTTPS. You can however use webserver or proxy server to put ebamobileservice under SSL connection.
5.1 Open and edit settings. Uncomment the lines to apply the settings.
5.2 Required settings are:
- internalHostname - enter server’s hotname or IP
- internalPort - define local port for service to run
- mobileHttpsPort or mobileHttpPort - define external port for connections to service
- sslCertificate - enter id of SSL certificate (example 0833debaca(eba,d.o.o.,ljubljana-productionagency))
- proxyPassword - generate with ebaautomation4
5.3 Import SSL certificate. SSL certificate is necessary for ebamobileservice to communicate with DB and Edge Apps via encrypted connection.
-
On Windows:
- Run CMD or Powershell as admin.
- Go to directory C:\Program Files\EBA Next Server\bin.
- Run
ebaautomation4.exe -installhttpscert "path-to-cert". - Enter certificate’s password.
- Copy displayed cert ID and enter it under sslCertificate parameter in ebamobileservice.ini.
- Start ebamobileservice with Services.msc app.

-
On Linux:
- To import SSL certificate run command:
/usr/local/bin/ebaautomation4.exe -installhttpscert /path/to/ssl_cert - Copy displayed cert ID and enter it under sslCertificate parameter in ebamobileservice.ini.
- Start ebamobileservice with systemctl start command. 5.4 Generate proxy password with ebaautomation4:
- To import SSL certificate run command:
-
On Windows:
- Run CMD or Powershell as admin.
- Go to directory C:\Program Files\EBA Next Server\bin.
- Run command
ebaautomation4.exe -proxypassword reset - Copy displayed password for later use.
- Password is written into ebamobileservice.ini automatically.

-
On Linux:
- Run command
/usr/local/bin/ebaautomation4 -proxypassword reset - Copy displayed password for later use.
- Password is written into ebamobileservice.ini automatically.
- Run command
6. Setup other EBA services
All other services are setup in similar fashion.
ServerName and serverPort settings are always required.
7. Setup Automation
Automation is an application triggered by Scheduler service or its tasks. There are several settings that can be set in automation.ini file:
This .ini settings file configures various aspects of an automation system related to EBA services. Here’s a brief breakdown:
7.1 Path Formatting: Paths use forward slashes (/), and backslashes () indicate line continuation.
7.2 Database Configuration: It includes another configuration file, ebaservices.ini, to read database connection parameters.
7.3 Logging: Specifies the log file path and log level. (Debug or Release)
7.4 Server Connection: Sets the endpoint URL for connecting to the EBA server, with optional timeout settings for connection, sending, and receiving data. Endpoint can be either production or test.
7.5 Report Settings: Defines a directory for reports and limits the number of saved reports to 10, with older reports being deleted.
7.6 File Integration: Lists directories for input, output, temporary, and error files.
7.7 Process Commands: Allows defining commands for pre- and post-processing data
7.8 Library Path: Optionally points to a directory for required SQL drivers.
7.9 Backup Settings: Defines a backup directory, file naming convention, and retention settings.
7.10 Encoding: Specifies the encoding used for input and output, with options for various character encodings like Latin1, UTF-8, and CP1250.
Next Edge Apps Install Guides
1. Overview
This quick guide shows how to install EBA Next Edge Apps on Windows device.
The EBA Next Edge Apps are a suite of applications designed to extend the capabilities of the EBA Document Management System. These applications enhance functionality, improve user experience, and provide specialized tools tailored to specific needs.
2. Prerequisites
- Windows 11 or newer.
- EBA Next Edge Apps msi installer.
3. Install guide
3.1 Open the .msi installer for EBA Next Edge App and click next

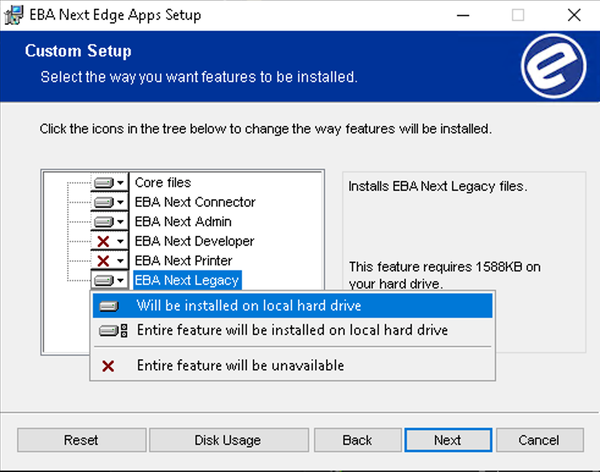
3.2 Select the following features to install:
- Core files: essential files for the functionality, integration and performance of the App within EBA Next.
- EBA Next Connector: Connection to scanner, OCR on documents, modifying original documents, Windows store certificates
- EBA Next Admin: Administrator tool for setting the system for use.
- EBA Next Developer: tool for developers for building scripts and reports. Includes tools for administrators: SQL browser and comspy.
- EBA Next Printer: a virtual printer - user can directly “print” into the EBA Next. No need to physically print and then scan the document to the system.
- EBA Next Legacy: COM interface.

3.3 Follow the instructions of the installation wizard.
3.4 When everything is installed, click Finish.

video:

1. Overview
Each EBA Next system must be registered as company, regardless if is it test or production environment.
2. Prerequisites
- EBA Next server installed
- ebamobileservice up and running

- EBA Next Edge Apps .msi installer
- Connection to ebamobileservice in EBA Next Admin
3. How to register a company in EBA Next Admin
3.1 Setup connection in EBA Next Admin.
3.2 Select connection to register.
3.3 Click on “Company registration” link below text.
3.4 Enter registration details for company.
3.5 Send notification about registration to support@ebadms.com
3.6 When confirmed, you can perform first login. You will be able to select environment either Test or Production in this step.

4. First login
For first login you have two steps. Firstly you have to fill out the details of supreme administrator, then you have two options:
4.1 You can use an Internal Certificate
4.2 You can use Qualified Certificate

1. Overview
EBA Next administrator is part of EBA Next Edge Apps installation package and is used for setting up EBA Next system.
2. Prerequisites
- EBA Next server installed
- ebamobileservice up and running
- EBA Next NEXT Edge Apps installer.
- Proxy connection details.
3. Setup connection to EBA Admin
3.1 Open EBA Next Admin.
3.2 Click on hamburger menu in upper right corner and select “Settings”

3.3 Add new connection and name it.
3.4 Click on connection and enter details:
- URL server address: Enter URL and port of server where ebamobileservice runs - format hostname:port.
- Password: Enter Proxy password that was generated with ebaautomation4.
- Test connection to see if you have connectivity to ebamobileservice.
- Accept SSL certificate that was used during setup.
3.5 Now you can login to EBA Next system.
Video instructions

1. Overview
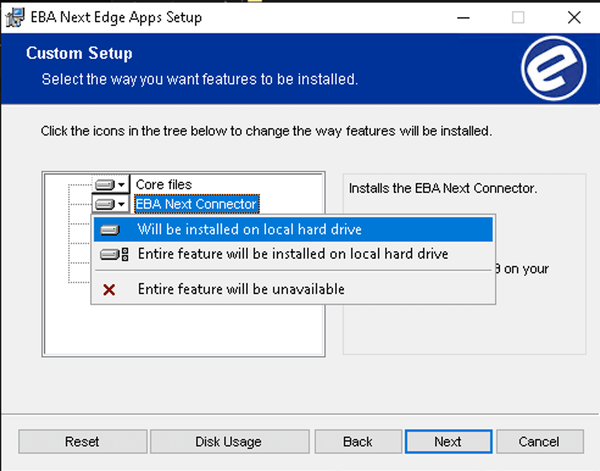
This quick guide shows how to install and setup EBA Next Connector.
The EBA Next Connector is an application that connects local computer’s resources with EBA Next system, such as local scanning device, local certificate store, integrates with MS/Libre Office, automatic updates attachment on content and uses local PC resources to perform OCR on content.
2. Prerequisites
- EBA Next System up and running.
- EBA Next Edge Apps installer
3. Install EBA Next Connector
Install Next Connector by selecting it when running EBA Next Edge Apps installer:
4. Setup new connection
-
Open web browser and log in to EBA Next system with user’s credentials.
-
Navigate to upper right corner and click on user’s menu.
-
Choose “Register EBA Next Connector”. A pop-up windows appears instructing you to open EBA Next Connector and trigger action “New connection”.
-
Open EBA Next Connector - double click on icon in system tray or search in installed apps.

-
Click on “New connection” to establish connection with Next user’s interface.
-
New prompt pops-up asking you to navigate to confirm connection in web browser. Return to your browser and confirm connection:

-
To confirm operating connection status must be “Logged in”:

1. Overview
This quick guide shows how to setup EBA Next Legacy interface on your local PC.
Legacy is basically Windows COM interface which is used in some integrations.
Next Legacy uses EBA Mobile service to connect local PC with EBA Next system via COM interface.
More details about COM interface on this link.
2. Prerequisites
- EBA Next Edge Apps installer.
3. Install guide
Install Next Legacy by selecting it when running EBA Next Edge Apps installer:
4. Setup Legacy interface
Legacy interface reads connection details from init.ini file which is located in C:\Programdata\EBANext\.
Init.ini file is generated with Next Admin. You can copy existing init.ini file and pase it into C:\Programdata\EBAnext folder.
Follow this guide on how to generate init.ini with Next Admin.
1. Overview
This quick guide shows how to install EBA Next Edge Apps on Windows device.
The EBA Next Edge Apps are a suite of applications designed to extend the capabilities of the EBA Document Management System. These applications enhance functionality, improve user experience, and provide specialized tools tailored to specific needs.
2. Prerequisites
- Windows 11 or newer.
- EBA Next Edge Apps msi installer.
3. Install EBA Next Developer
Install Next Developer by selecting it when running EBA Next Edge Apps installer:
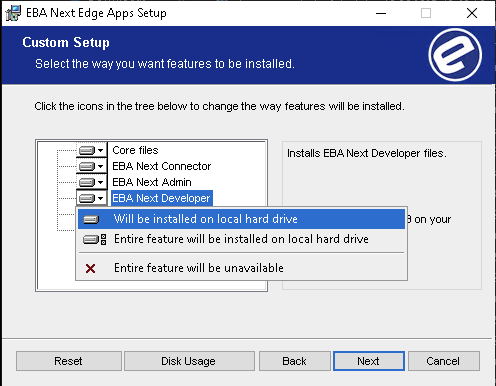
To start the EBA Next developer go to this location C:\Program Files\EBA Next Edge Apps\bin and double-click on ebadeveloper.exe. You can also create a shortcut for it.
1. Overview
This quick guide shows how to install EBA Next Printer.
The EBA Next Edge Apps are a suite of applications designed to extend the capabilities of the EBA Document Management System. These applications enhance functionality, improve user experience, and provide specialized tools tailored to specific needs.
2. Prerequisites
- Windows 11 or newer.
- EBA Next Edge Apps msi installer.
3. Install EBA Next printer
Install Next Printer by selecting it when running EBA Next Edge Apps installer:

Organization and Users Setup
1. Overview
This quick guide shows how to add a workplace in EBA Next Admin.
2. Prerequisites
- EBA Next Admin installed
- Administrator privileges
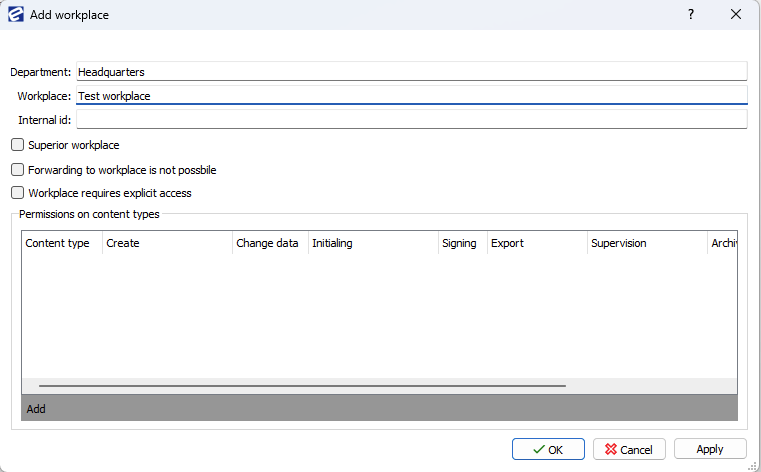
3. Adding a workplace
- When you open EBA Next Admin you will be in Common view. First go to Organizations and step inside (double click) one organization you have made. Here we will choose Company A.

- In Organization Schema right click on Headquarters and select Add workplace.

- You will then be able to name the workplace and give privileges to that workplace. After that click on OK.
1. Overview
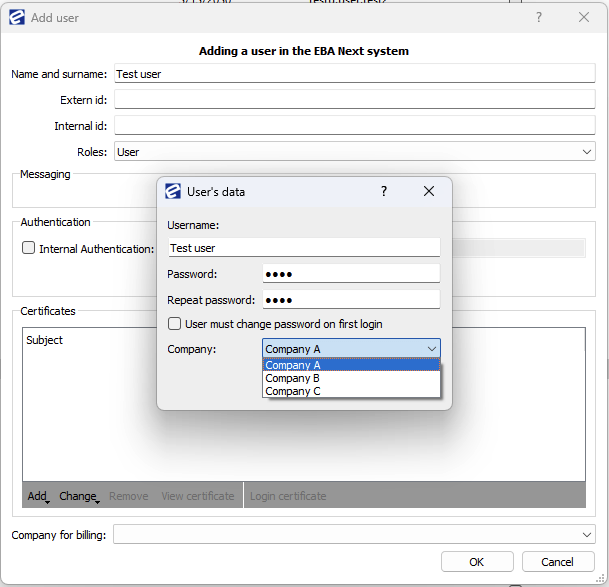
This quick guide shows how to install add a user in EBA Next Admin.
2. Prerequisites
- EBA Next Admin installed
- Administrator privileges
3. Creating a user
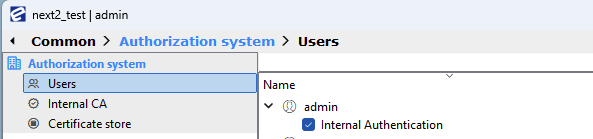
- When you open EBA Next Admin you will be in Common view. There you will select Users under Authorization system.
- Click on Add, you will then see a form for a user. Fill out the user info and under certificates choose Internal Certificate. Another form will show up here you will create a password for the user and select in which company the user will work.
1. Overview
This quick guide shows how to give permissions on workplace.
2. Prerequisites
- EBA Next Admin installed
- Administrator privileges
3. Add permissions on content types
- When you open EBA Next Admin you will be in Common view. First go to Organizations and step inside (double click) one organization you have made. Here we will choose Company A.
- Double click on the workplace we have just created.
- Click Add to add the content type you want to set permissions for. Then click on OK

1. Overview
This quick guide shows how to give permissions on workplace.
2. Prerequisites
- EBA Next Admin installed
- Administrator privileges
3. Permissions On workplaces
Permissions are assigned to a workplace. If more users are assigned to one workplace they have the same permissions and they all have the same access to contents. That means if a content is forwarded to one user on the workplace all other users have access to that content.
Note: Permission changes are not applied retroactively – previous content access must be assigned manually if necessery Note: if a specific user should have, in a certain situation, different permission than declared on a workplace it can be solved by Permission rules.

If you mark Content type a workplace all permission are enabled.

To select permissions just mark them.
Each user must be assigned at least one permission — at minimum, the Read permission
Read Read permission allows a user to view content only. The user cannot edit or modify the content or its metadata in any way. Additionally, the user is not allowed to export, share, or forward the content to others. This permission is strictly for view-only access
Create Permission Create allows importing/ creating a new content (import from file, drag&drop, scan, import from EBA Next Printer, create a content based on template or report)
Example: User doesn’t have permission to import an incoming invoice.

User is allowed to import incoming letter by clicking on +

Change data Permission Change data allows users on a workplace to change meta-data and perform all actions on a content (connecting /inserting/ versioning, adding comment/ attachment,…). If users on a workplaces don’t have this permission they are read-only users.
Initial Permission Initial allows users on a workplace to use action Initial. Initial is enabled on open content.

or on list of contents in a main window with right click.

If a workplace doesn’t have permissions Initial, button Initial is disabled.

Sign Permission Sign allows users on a workplace to sign a content. Only user who has a qualified certificate can sign a content, even though this permission is marked.
If user who has an internal certificate wants to sign a content (and has permission to sign) signing is prevented.

Signature Permission to a sign content.
Signature request Permission to create a signature request for remote signature.
Export Permission Export allows users on a work place to print a content, to export a content, to send a content via e-mail and share content.
Note: if only Export is marked no options is working. You have to mark every option to allow specific permission.

- Printing allows printing a content. Action. Print can only be executed on open content.
- Export to disk allows exporting a content in pdf format.
- Sending via e-mail allows sending a content via e-mail. Sending via e-mail can only be executed on open content.
- Sharing allows sending content via share portal.
(A) Printing, export to disk actions are executed on an open content by choosing it in Actions.

- Export has options what to export

After confirming content is in downloads.

- Sending via e-mail has options what to send.
After confirming a dialog is opened. In a lower left corner is an information is sending is available or not.

Prerequisites for sending are:
- that user has email information entered. Check user’s data in Admin> Company> Authorization system> Organization Schema or Common> Authorization system> Users
- established connection to the mail server Company > Notification system > Accounts
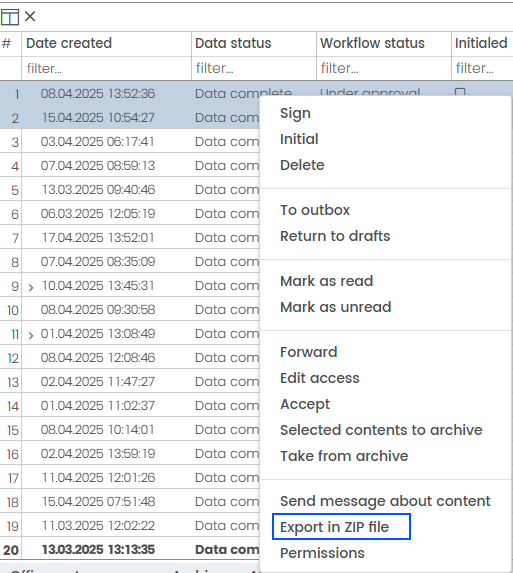
(B) On a list of contents only Export to pdf is allowed. The action is Export in ZIP file and it can be selected with right click. It works the same way as Export to pdf, except that ZIP file is created.
Sharing The share portal is accessed via a link that the user receives by email. Link is in format https://domain.com/shareportal
Share portal is activated in ebamobilservice.ini - enablePortal = true
Supervision Permission Supervision means that users on a workplace has access to contents of certain content type without being directly in touch with the content. Supervision can be Without limitation meaning that all contents of certain content are accessible. You can set limited supervision.

When you mark Supervision, a dialog opens. To set supervision with no limitations just confirm dialog.
To set supervision without limitations you have to define a rule. Rule has to have a name, conditions for limited supervision and exceptions if existed.

In example above users on a workplace have access to all content which meta-data Invoice type has value STR.
Supervision permission is presented in EBA Next as “Supervision” in scope selector (for supervision with/ without limitations).

Archive Permission Archive allows user on a workplace to manually archive a document or take from archive with action Selected contents to archive/ Take from archive. Those two actions can be executed only on a list of contents in main window.

Set read only Permission Set read only allows user on a workplace to set content to be read-only.
In EBA Next set read only content is set on an open content in a Menu Bar.

To remove read only select Remove read only.

External network
External network means that you can restrict access to content depending on whether the user is accessing from the local network or external. So, for example, users can have an internal network and access to all contents It can be set for example, that users who are out of office or external persons do not have access to everything.
Prerequisite Setting in Authentication > Protocols > Filters
Content Capture Setup
1. Overview
This quick guide shows how to capture content into the system.
2. Prerequisites
- Windows 10 newer.
- EBA Next NEXT Edge Apps msi installer.
- Proxy connection details.
3.
- First step
- Second step
1. Overview
This quick guide shows how to install EBA Next Edge Apps on Windows device.
2. Prerequisites
- Windows 10 newer.
- EBA Next NEXT Edge Apps msi installer.
- Proxy connection details.
3.
- First step
- Second step
1. Overview
This quick guide shows how to install EBA Next Edge Apps on Windows device.
2. Prerequisites
- EBA Next Connector installed - see Next Edge Apps install guide
- Connection between EBA Next user interface and EBA Next Connector established. Follow [this] install guide.
3.
- First step
- Second step
Content Models Setup
1. Overview
This quick guide shows how to create Content Modules in EBA Next Edge Admin on Windows device.
2. Prerequisites
- Windows 10 newer.
- Working EBA Next Admin
3. Creating Content Modules
- When you open EBA Next Admin you will be in Common view. First go to Organizations and step inside (double click) one organization you have made. Here we will choose Company A.

- Under Content Settings select Content Models and click on Add button to add a new Content type. Here you will fill in the Description field. After adding, content type will turn red.

- Select content type and click on the Edit button. Here you will see:
- Content type ID - shows the ID of the Content type
- Table name - shows in which table in database is this Content type stored at

- We have to select Class type. Click on Class type settings, there you will have a Class type drop down menu with three options:
- Content - document and metadata
- Record - metadata
- Image - image and metadata
IMPORTANT: Note for setting record or image, EBA Advanced Digital must be ordered! It will be conformed if its ordered in contract of lease! IMPORTANT: If we would like to create an automatic template for a type of content selected under Content Creator, we need to define who the template is from
We will select content.

- We have to create a group and add Content type to that group. Under Content Settings select Groups and click on New group.

- After that you will select the Group you have just made and click on Add to group. Here you will select the desired Content type. After selecting click Apply.

Content Selector in EBA Next Admin
A content selector is used when the current content type contains a table with the same metadata as a table in another content type. It helps avoid duplicating effort by allowing you to reuse metadata instead of entering it twice.
How to Set Up a Content Selector in EBA Next Admin
1. Open EBA Next Admin
Navigate to Organisations → Content Modules, and select the content module where you want to set up the content selector.
2. Add the Content Selector to Your Content Model
In the field box, find Content Selector and drag it into your content model.
3. Configure the Content Selector
In the Property Editor, provide the following:
- ID
- Caption
- Under Content Type, select the content module from which you want to retrieve metadata.
- Display Field
Note: If you skip this step, an error will appear when trying to save.
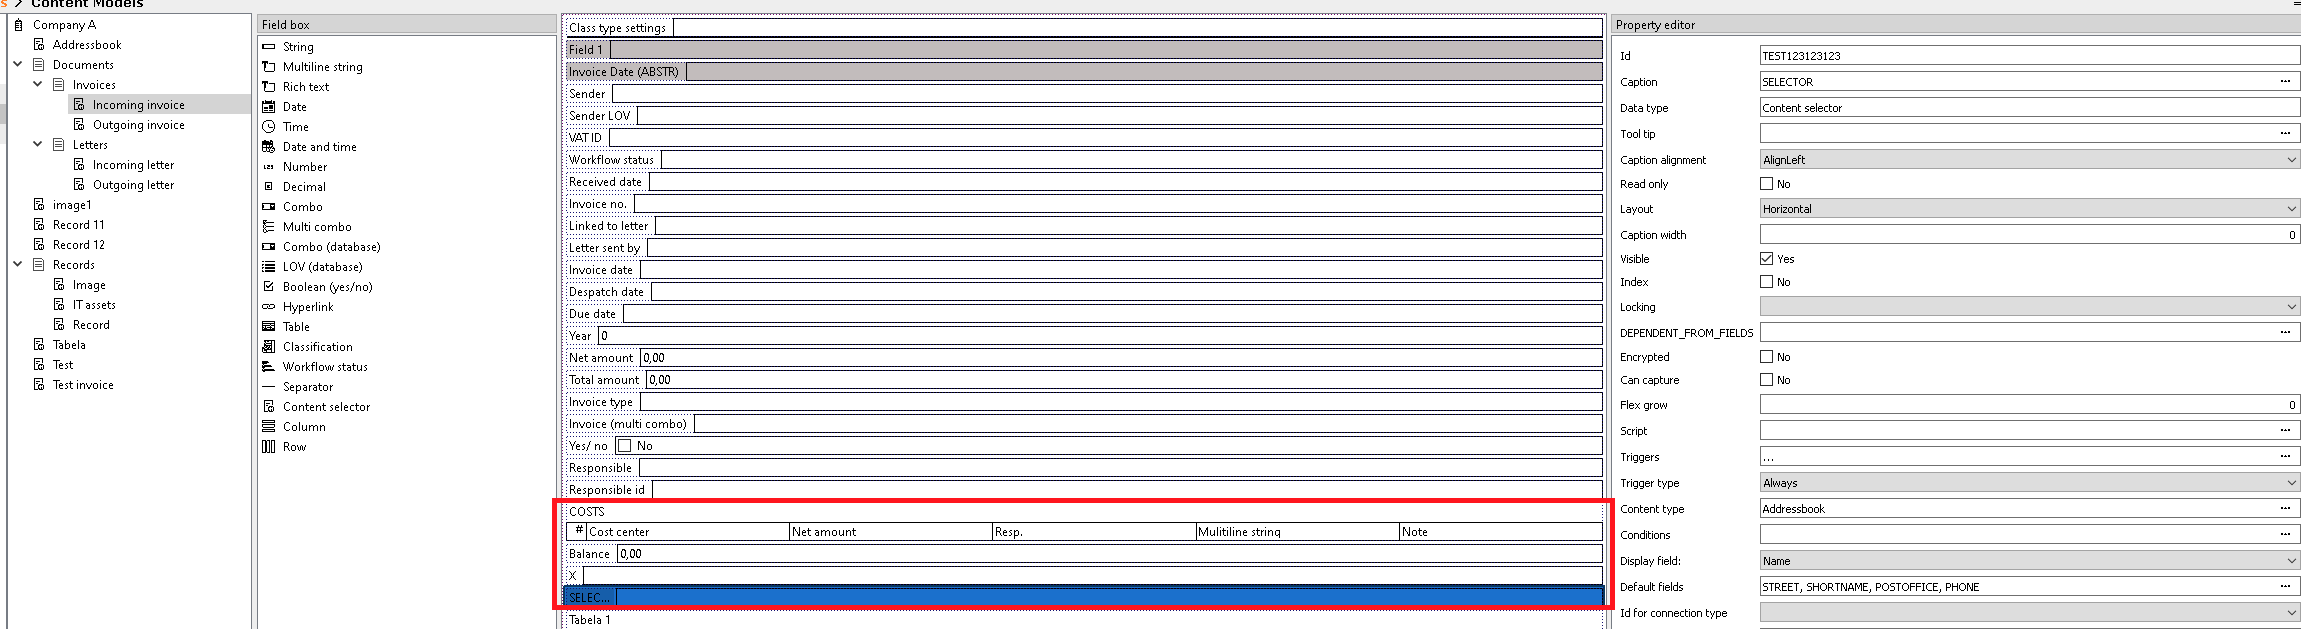
Example:
- Current Content Module: Incoming Invoice
- Table: COSTS
- Content Selector ID: TEST123123123
- Caption: Selector
- Content Type: Addressbook
- Display Field: Name
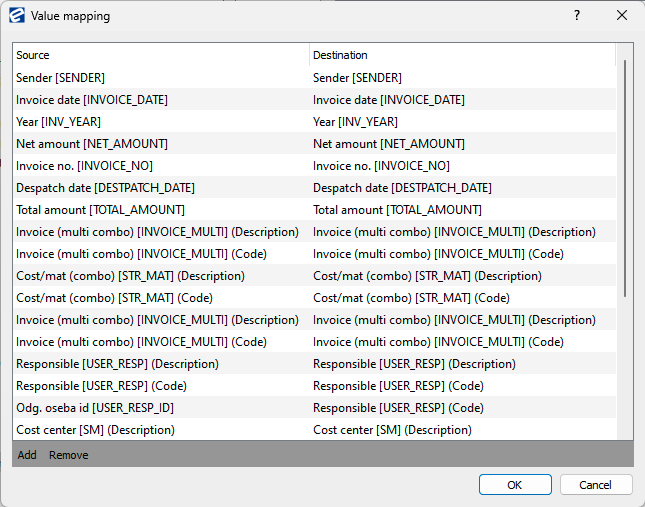
4. Set Up Value Mapping
Under the Value Mapping section, press the three dots — a new window should appear.
- On the left side (Property) — select the column from the other content module (e.g., Addressbook).
- On the right side (Field) — choose the field in your current content module where this data should be written.
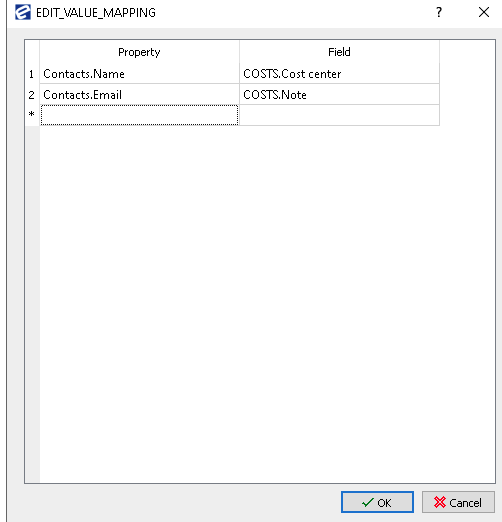
Example Mapping:
Addressbook.Contacts.Name → Incoming Invoice.COSTS.Cost center
→ This means whatever is entered in the Name field in the Contacts table in the Addressbook will be copied into the Cost center field in the COSTS table in the Incoming Invoice.
Note: Make sure that all relevant tables and fields are set to be visible in your content model. If any required table or field is hidden, the content selector may not function properly in EBA Next.
Metadata does not auto-refresh in EBA Next — you need to manually refresh the data in the table.
If you want the metadata in the table to be automatically deleted, make sure you have correctly configured the Dependent_from fields.
1. Overview
This quick guide shows how to create content metadata.
2. Prerequisites
- Windows 10 newer.
- Working EBA Next Admin
3. Creating Content Models
- When you open EBA Next Admin you will be in Common view. First go to Organizations and step inside (double click) one organization you have made. Here we will choose Company A.
- Click on the content type that we have created (in our case Test) then drag and drop the desired metadata (in our case we will use String) in to the metadata list.
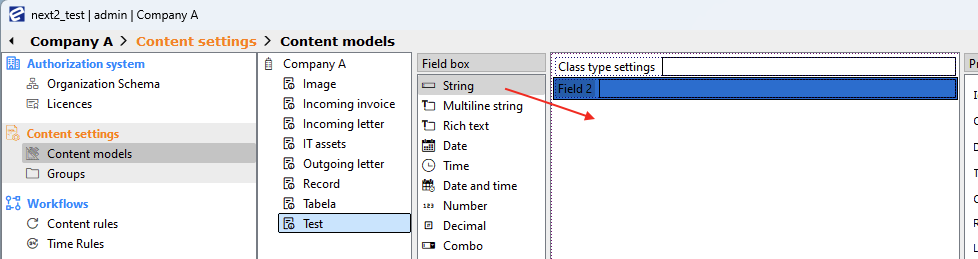
- We have to give metadata an ID in Property editor.

- OPTIONAL You can set property’s on a Content model.

- Timers - are stopwatches that track elapsed time. You can start/pause them in rules, and view details like start time, duration, and name in a subtable.
- Signature Clauses - displays digital certificate details (e.g., issuer, expiry date) used for electronic document signing. Proves signature validity even on exported, shared, or printed copies.
- Form width - adjusts to the screen but never exceeds the max limit. If wider, fields don’t stretch; if narrower, they shrink. Horizontal scroll is disabled.
- Taskbar description & info - set what appears in the taskbar for open items (windows) and their hover thumbnails.
Share And Signing Content
Content Workflow Setup
1. Overview
This quick guide shows various content rules examples in EBA Next.
2. Rule Examples
2.1 Sign new content with qualified certificate
To ensure the integrity of new and captured content each content can be signed with qualified certificate. Signing of new content can be performed automatically by Content rule.
Prerequisites: imported qualified certificate in certificate Store
Rule example:
Conditions
on action: after:Save
is_of_content_type_-IS_OF_CONTENT_TYPE Incoming Invoice
Content is new
Actions
sign with certificate “e.g. Scanning”, Company A, clause: No
2.2 Set a creation date of a content
To set creation date of a content automatically we can define rule as example below.
Rule example:
Conditions
on action: after:NEW_DOCUMENT
is_of_content_type_-IS_OF_CONTENT_TYPE Outgoing Invoice
Actions
run trigger in meta-data RECEIVED_DATE
Note: Trigger’s name is optional, defined in Content model.

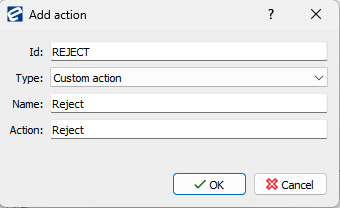
2.3 Guard of mandatory comment
Situation: an invoice has to be rejected and a rejecting process requires that comment is mandatory. For rejecting custom action “Reject” is used.
Rule example:
First custom action should be defined.
Conditions is of content type Incoming invoice Actions: Add action Custom action REJECT
Conditions
on action: before: Custom ( Reject )
is of content type Incoming invoice
Actions:
set workflow status 100 - Rejected
Guard
Conditions
current user added comment
Actions:
On invalid evaluation notify

Example of a rule and guard.

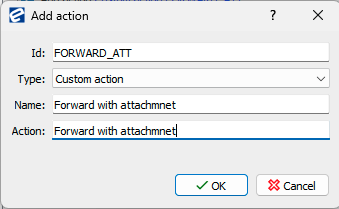
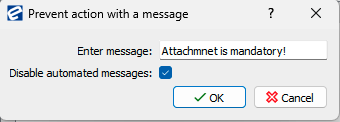
2.4 Guard for mandatory attachment
Situation: an attachment must be attached to an invoice in specific workflow status before forwarding a content to a user. Guard is set on a custom action.
First custom action should be defined.
Conditions is of content type Incoming invoice Actions: Add action Custom action FORWARD_ATT
Conditions
on action before: Custom ( Forward with attachmnets )
is of content type Incoming invoice
workflow status is 0 - Received
Actions:
forward to Company A/Headquarters/Sales/Sales manager
(take content from currently holding users)
Guard
Conditions
number of attachments greater or equal 1
Actions:
On invalid evaluation notify
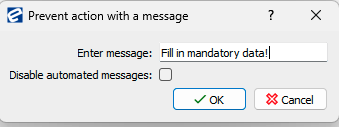
2.5 Guard for mandatory data
Situation: when an invoice is in a specific workflow status mandatory data have to be entered before continuing a workflow.
Rule
Conditions
on action before: Save
is of content type Incoming invoice
workflow status is 0 - Received
meta-data contains Invoice no. is not empty  and Net amount is not empty  and Invoice date is not empty  and Cost/mat (combo) is not empty  and Invoice (multi combo) in TIP 1, TIP 2
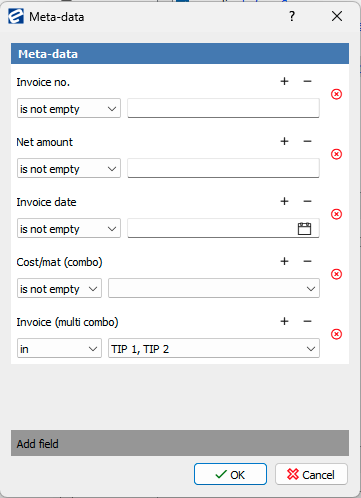
Actions:
On invalid evaluation notify
Example for conditions for table data:
In EBA Next mandatory data are marked red, and tag “Issues” contains information about mandatory data. When a content is imported/ created, guard is triggered by “Save”.
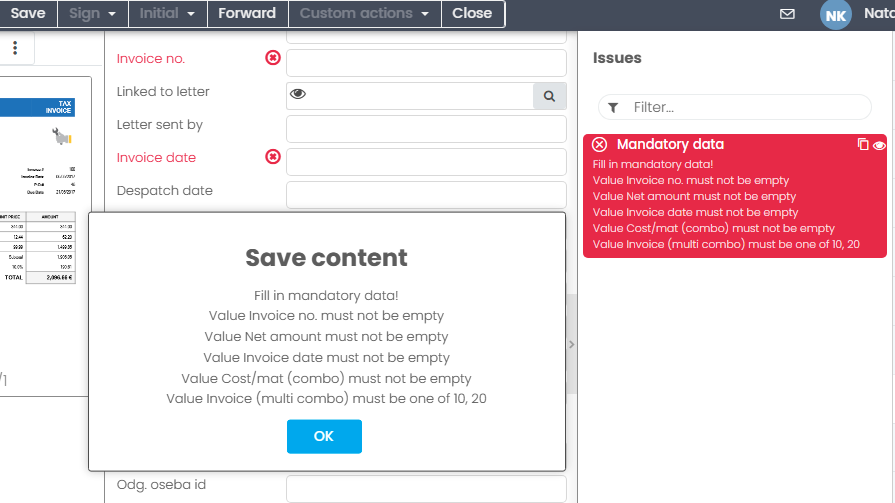
When fiiling in mandatory data, changes are applied after Save.
If you close a content with errors without saving then a content is not saved in EBA Next. If you close a content without errors then a content is saved in EBA Next.
2.6 Archiving connnected contents
Situation: you want to archive a content and at the same time a connected content should also be archived.
Rule
Conditions
on action: after:Custom ( Archive )
is of content type Incoming Invoice
Actions
archive content
Connected rule
Conditions
connection type is Contains:Connected content
is of content type Incoming letter
Actions
archive content
Example of a rule and a connected rule.

2.7 Copying meta data when versioning content, connecting or inserting contents.
Situation: you want to copy data from existing content to a new version. The same procedure is for linking and inserting content.
Rule
Conditions
on action after:New version
is of content type Incoming Invoice
Connected rule
Conditions
connection type is contains Previous version
is of content type  Incoming Invoice
Actions
set data on connected content Sender [SENDER] --> Sender [SENDER], Invoice date [INVOICE_DATE] --> Invoice date [INVOICE_DATE]…
Action Set data means which meta data are copied from existing version to a new version.
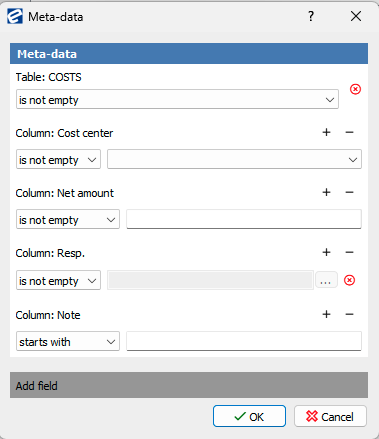
2.8 Checking duplicated contents
Situation: you import/ scan new content and want to check if the same one already exists. Checking is executed for incoming invoice, criterias for checking are the sender, the invoice date in a current year and the invoice number.
Group of rules
Conditions
is of content type Incoming invoice
Group of guards
on action after: Save, Data change
meta-data contains Invoice no. is not empty and Sender is not empty and Year is not empty
meta-data fields changed Invoice date and Sender or Invoice no.
Guard
Conditions
number of contents

When you select content type you have to select meta-data with Add field.
Actions
on invalid evaluation notify

Example of a rule and guards for checking duplicated contents.

When guard prevents executing rule Tab Issue gets red mark and contains a message which you entered in a guard.

In EBA Next is already incoming invoice with meta-data as follows.

When the same invoice is imported a guard is triggered.
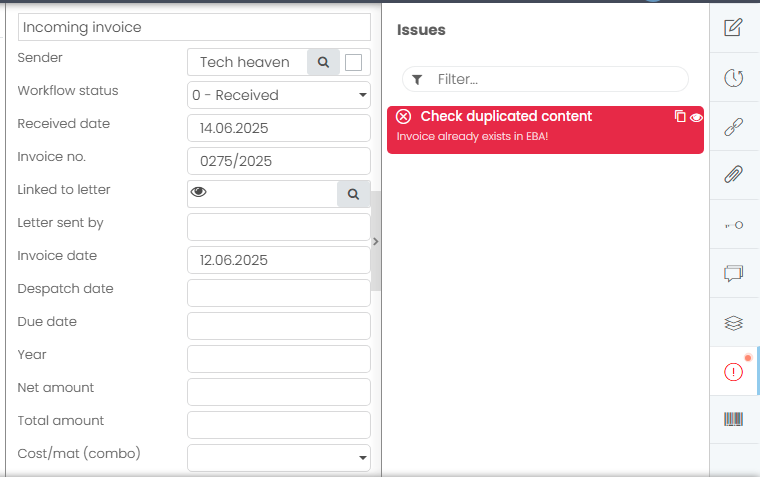
A this point you can:
- just save a content to process it later. In this case list of contents this content has “Data status” = Data has errors

- change meta-data if needed and continue with the workflow
- delete a content if it hasn’t been signed yet
RULE TRACING IN EBA NEXT
As an Administrator in EBA Next, you can trace a rule that you’ve created or implemented for specific content. This feature helps administrators understand how a rule behaves—whether it triggered as expected, started, executed, or finalized.
If you’re not familiar with setting up rules in EBA Next, refer to our Quick Admin Guides, specifically the guide titled:
“Content Workflow Setup in Quick Admin Guides”.
We’ve created a rule called “Rule Trace”. This rule is triggered when content changes its workflow status. Once initiated, it forwards the content to the next user in the workflow.
How to Start Rule Tracing
- Log in EBA NEXT as ADMINISTRATOR
- Click on the user icon located in the top left corner.
From the dropdown menu, select “Rule Trace”.

A new browser window should open. This is the Rule Trace Dashboard, where you can see all groups of rules, actions, and their configurations.

Select the Rule
In the “Rules” tab, locate and select the rule you want to trace. Click Start to begin the trace.

Now perform the actions in EBA Next that should trigger the selected rule.
If the rule is triggered, it will appear in the list of executed rules.

- Matched —> Indicates whether the rule conditions were met
- Executed —> Shows whether the rule was executed
- Final —> Specifies if this is the final rule; if marked Final, no further rules are executed after this
- Timestamp —> The date and time when the rule was performed.
Adding Catalogs in EBA Next
Instructions for Adding Catalogs in EBA Next
1. Obtaining the Catalogs
You can obtain the catalogs from our developer portal: https://dev.ebanext.com/
The Public → Catalogs project can be downloaded in two ways:
-
Download ZIP package
https://dev.ebanext.com/next-public/catalogs/-/archive/main/catalogs-main.zip -
Git clone the repository
git clone https://dev.ebanext.com/next-public/catalogs.git
2. Adding the Master Catalog
- Open EBA Next Admin.
- In the Catalogs menu, select Add master.
- Choose the appropriate master catalog file.
- For example, for invoices:
catalogs/invoice/master/catalog_invoice_master.xml
3. Adding Specific Catalogs
- Select Add catalog and add the desired catalogs.
- Examples for invoices:
a) UBL 2.1 CRO
- Catalog:
catalogs/invoice/UBL_2.1_CRO/catalog_invoice_UBL_2.1_CRO.xml
- Schema:
catalogs/schemas/UBL/UBL-2.1/maindoc/UBL-Invoice-2.1.xsd
b) eSlog 2.0
- Catalog:
catalogs/invoice/e-SLOG-2.0/catalog_eSLOG20_INVOIC_v200.xml
- Schema:
catalogs/invoice/e-SLOG-2.0/eSLOG20_INVOIC_v200.xsd
4. Usage in the Content Model
- In the Content Model, select the desired master catalog, e.g.:
catalog_invoice_master
- In exchange rules, select the appropriate specific catalogs, e.g.:
catalog_eSLOG20_INVOIC_v200 catalog_invoice_UBL_2.1_CRO
Content Adressbook Setup
Address Book Transfer
What is an Address Book?
An address book is a record containing all the metadata related to your business partners.
How to Prepare the Address Book Before Implementation?
The recommended data fields for the EBA address book are:
- External ID (e.g., from ERP systems)
- Company Short Name
- Company Full Name
- Street Address (including building number)
- Postal Code
- City/Post Office Name
- Country
- Tax Number
- Registration Number
It is advisable to review and clean up the data to ensure it meets the above requirements.
If you want to include additional columns of data — such as specifying whether a partner is a buyer or supplier — please inform your system administrator before the implementation.
If necessary, additional columns can also be added later.
The data should be prepared in table format.
Prepare Script
This script must be customized for each company based on the structure of the table they provide.
For instance, if a company provides a table that uses the field name address instead of street, you can simply adjust the SQL query like this:
sQue += " address"; // 1
Then, when processing the query results, you can map the field to your internal naming convention:
var street = que.value(1);
This way, the value from the source table’s address column (index 1) will be fetched and stored as street in your internal data structure or new database.
Example of Script
function main()
{
    /* put your code here */
}

function serverMain()
{
    /* put your code here */
}

function transfer()
{
    logDebug("AddressbookTransfer::transfer: begin");           //Logs the start of the transfer process

    var sAddressbookContentType = "addressbook";                //Defines constants: content type and data source ID.
    var sSourceId = "TEST_XML";

    var db = application.connection("TEST");                    //Connects to the database named "TEST"

    var sQue = "";                                              //Builds an SQL query to fetch all relevant fields from the eba_addressbook table
    sQue += "select ";
    sQue += "  name,";           //  0
    sQue += "  shortname,";      //  1
    sQue += "  street,";         //  2
    sQue += "  town,";           //  3
    sQue += "  country,";        //  4
    sQue += "  zipcode,";        //  5
    sQue += "  postoffice,";     //  6
    sQue += "  email,";          //  7
    sQue += "  phone,";          //  8
    sQue += "  fax,";            //  9
    sQue += "  taxnum,";         // 10
    sQue += "  companyid,";      // 11
    sQue += "  gln,";            // 12
    sQue += "  orgunit,";        // 13
    sQue += "  extern_id,";      // 14
    sQue += "  tax_obligation,"; // 15
    sQue += "  vatid,";          // 16
    sQue += "  buyer,";          // 17
    sQue += "  supplier";        // 18
    sQue += " from eba_addressbook";

    var que = new QSqlQuery(db);                            //Executes the query and logs an error if it fails.
    if (!que.exec(sQue)) {
        logWarning("AddressbookTransfer::transfer: select failed, error=" + que.lastError().text() + " query=" + sQue);
        return;
    }

    while (que.next()) {                                    //Loops through the results. Reads values from each row.
        var name           = que.value(0);
        var shortname      = que.value(1);
        var street         = que.value(2);
        var town           = que.value(3);
        var country        = que.value(4);
        var zipcode        = que.value(5);
        var postoffice     = que.value(6);
        var email          = que.value(7);
        var phone          = que.value(8);
        var fax            = que.value(9);
        var taxnum         = que.value(10);
        var companyid      = que.value(11);
        var gln            = que.value(12);
        var orgunit        = que.value(13);
        var extern_id      = que.value(14);
        var tax_obligation = que.value(15);
        var vatid          = que.value(16);
        var buyer          = que.value(17) == "Yes";        //"YES" is used to mark buyer/supplier as true or false
        var supplier       = que.value(18) == "Yes";

        var content = null;

        var qc = application.newQueryCriteria(sAddressbookContentType);     //Prepares a query to check whether the content (entry) already exists based on extern_id and source
        qc.addExternId(extern_id);
        qc.addValue("source", sSourceId);
        var aIds = application.queryContents(qc);

        if (aIds.length == 0) {                                             //Creates a new content entry if none exists, otherwise retrieves the existing one
            content = application.createContent();
            content.contentType = sAddressbookContentType;
            content.externId = extern_id;
            content.source = sSourceId;
        } else {
            content = application.getContent(aIds[0]);
        }
        //All the field values are set on the content object. These fields (metadata) must be defined in EBA Next Admin as part of a class-type record (content type definition) before running the script
        content.data.setValue("NAME",           name);
        content.data.setValue("SHORTNAME",      shortname);
        content.data.setValue("STREET",         street);
        content.data.setValue("TOWN",           town);
        content.data.setValue("COUNTRY",        country);
        content.data.setValue("ZIPCODE",        zipcode);
        content.data.setValue("POSTOFFICE",     postoffice);
        content.data.setValue("EMAIL",          email);
        content.data.setValue("PHONE",          phone);
        content.data.setValue("TAXNUM",         taxnum);
        content.data.setValue("REGID",          companyid);
        content.data.setValue("GLN",            gln);
        content.data.setValue("TAX_OBLIGATION", tax_obligation);
        content.data.setValue("VATID",          vatid);
        content.data.setValue("BUYER",          buyer);
        content.data.setValue("SUPPLIER",       supplier);
        content.save();
    }

    logDebug("AddressbookTransfer::transfer: end");
}
Importing a Script into EBA Next Admin
- Open EBA Next Admin.
- Go to Organizations → Scripts → Applications.
- Click Import and upload the ZIP file containing your script.
- After importing, make sure to activate the script.
For the address book ZIP file, contact EBA Support to receive the download link.
Need to Know
The script may take several minutes to complete, especially if a large amount of data is being transferred from the source table to the database.
Content Exchange Setup
1. Overview
This quick guide shows how to setup content exchange in EBA Next.
There are several ways to exchange content in EBA Next:
Content can be received via various protocols. Different protocols can be used in EBA Next, one of the most used protocols for receiving content is via e-mail (IMAP exchange). Each exchange protocol is defined via exchange plugin which must be imported into EBA Next system. Common exchange plugins are emailexchange, as2exchange etc.
EBA Next connects to specified exchange protocol each time when function send/receive is triggered.
EBA Next contains the EBA eXchange license for the electronic exchange of legally valid documents with business partners.
EBA Exchange license is required to execute content exchange in EBA Next. This license is billed on monthly basis. Receiving of content is free of charge while sending content is billed per sent content 0,05 EUR.
EBA eXchange also has sub-license:
- EBA eXchange Advanced: allows you to receive and send invoices in parallel over multiple channels at the same time; i.e. receive documents in parallel over multiple channels, send documents in parallel over multiple channels and even receive and send documents in parallel over multiple channels at the same time.
The Customer may add an additional license and sub-license at any time during the term of the Contract, at the price in force at the date of the order. Additional licenses cannot be cancelled, but the EBA eXchange Advanced sub-license can be cancelled.
1.1 Common exchange operating principle
An exchange in EBA Next is performed via script plugins.
Some exchange plugins are free of charge, available here.
Some exchange plugins are payable (usually when they connect to 3rd party WS). For full list of free and paid exchange plugins consult with your licensed EBA partner or contact our support.
Each plugin can cover receiving and/or sending content.
When receiving a content a receiving rule must be set. In receiving rule we define some specifics for received content such as content’s sender, content data format, content type etc. We can also set mapping from e-invoice’s xml data file to defined meta data.
Same applies when sending - we must define sending rule to set certain data (content receiver, content type and format, etc.). With rules we “tell” the system what we want to receive and/or send.
To fully automate receiving or sending content certain criteria must be met:
- For receiving: EBA Scheduler service must be set
- For sending: Content must have data status “to outbox” and EBA Scheduler service must be set
Note: We do not offer support how to setup protocols (like IMAP, SMTP, O365). It is expected that exchange protocol is set up by experienced IT personnel and prepared to integrate into EBA Next system.
2. Prerequisites
- EBA Next system up and running.
- Exchange plugin. Plugins can be downloaded here. If you need paid plugin contact your licensed EBA partner.
- Chosen exchange protocol up and running.
- Exchange protocol settings (IMAP/SMTP/MSExchange etc.).
- EBA eXchange license ordered
- (Optional) Data catalog to transform data from/to xml file (for example: UBL, Edifact formats)
3. Order EBA eXchange license
- Login into EBA Next admin.
- Choose organization and navigate to Authorization System>Licenses.
- Select desired Exchange license from list and click on button Subscribe and then Apply.
4. Importing Exchange plugin into EBA Next
- Login into EBA Next admin.
- Choose organization and navigate to Scripts>Plugins.
- Import plugin (do not extract zip file).
- Activate plugin.
5. Entering Exchange protocol settings
- Login into EBA Next admin.
- Choose organization and navigate to Exchange>Protocols
- List of available protocols depends on imported plugins
- Choose desired protocol from the list
- On right side select tab “Reception settings” to setup connection or tab “Sending settings” to setup sending content.
- Create new account and name it. Choose a name so you can later identify which account you have set.
- Enter needed connection details such as:
- host
- username
- password
- etc.
- Test your login credentials and connectivity by clicking on button “test connection”
6. Define Exchange rule
- Login into EBA Next admin.
- Choose organization and navigate to Exchange>Receiving Rules for receiving or Sending rules for sending. For detailed example see Exhange Rules section.
7. Define Send/receive task on Scheduler service
- Login into EBA Next admin.
- Go to Scheduling>Task Schedule
- Add new task:
- Set interval
- Set range (optional)
- In task type drop-down select Send/Receive.
8. (optional) Import data catalog
- Login into EBA Next admin.
- Choose organization and navigate to Exchange>Catalogs
- Import master catalog (for example invoice).
- Import catalog (for example EDIFACT)
- Catalogs are available to all EBA Licensed Developers on EBA DEV Portal.
Exchange Rules in EBA Next
In EBA Next, you can define rules for receiving and sending content via EBA Next Exchange.
For instructions on how to set up the Exchange itself, please refer to our guide: [Content Exchange Setup].
Receiving Rules
Receiving rules allow you to define what should happen to specific content when it is received via email into EBA Next.
How to Set Up Receiving Rules
- Open the EBA Next Admin interface.
- Navigate to Organisation → Exchange → Receiving Rules.
- Click Add, and then select either:
- Add IMAP Email Exchange, or
- Add Microsoft Exchange,
depending on the email protocol you’ve configured for EBA Next Exchange.
- Configure the Rule
Name: Define a clear and descriptive name for the rule.
Conditions:- Sender Email List:
Specify the sender’s email address this rule applies to.
You can enter a specific address (e.g.,example@eba.si), or a wildcard for the domain (e.g.,<*@eba.si>), which applies the rule to all senders from that domain.
The system checks the “From” header of the incoming email. - Receiver Email List (optional):
Leave this blank if the rule should apply regardless of the recipient.
If a specific address is entered, the rule will apply only if the email was sent to that exact recipient. - Subject Contains (optional):
Enter a string to match against the email subject (e.g.,Invoice).
Leave this field empty to apply the rule to all subjects. - Email Account:
Select the email inbox this rule applies to.
A dropdown list will appear with available email accounts, assuming they have already been defined under Exchange Protocols.
- Sender Email List:
Settings
-
Multiple Documents from One Message
Enable this option if you expect multiple documents of the same type in a single message (e.g., 3 invoices).
Note: A single document may consist of two related files (e.g.,.pdfand.xml). -
Content as Presentation
Use the email body as a preview in the system only if the document itself is not attached as a file. -
Presentation Filename Pattern
Define the file used for preview — usually a.pdf.
Example:<*.PDF>, which tells the system to use the.pdfattachment for display. -
Data Filename Pattern
Define the associated data file — usually.xml.
Example:<*.XML>, which matches the corresponding XML file. -
Send confirmation
Enable this option to automatically send a receipt confirmation once the message is successfully imported. -
Content as attachment
Attach the entire email content as an attachment to the imported document. -
Data as attachment
Attach the data file (e.g., XML) to the document as a separate attachment. -
Presentation same Name
Ensure that the presentation and data files have the same name (excluding the extension) to match them properly. -
Content type
Define the content type (e.g., Incoming Invoice) that this rule is intended for. -
Partner Field
Specify where to write the partner information (optional).
Partner
- Unknown Partner: Use this if the partner is not known or you don’t maintain a partner list.
- Choose Partner: Select from a predefined list of partners.
- Script: Write a custom script to dynamically select the partner.
- Query: Provide a query to fetch the partner from an external database.
Additional Settings
-
Data Format:
Select this if the content is an e-invoice and choose the appropriate data format/catalog. -
Data Transformation Script:
If needed, define a script to transform the received data before processing. -
Report:
Select a predefined template to mark the received content accordingly. -
Control:
Define the system behavior if the content is not digitally signed. -
Deliver Content to Users by Default:
Select the default user to whom the content will be delivered after import.
Tip: Copy and Modify Rules
If multiple senders have similar rules, you can copy existing rules and modify only the partner or specific details — saving time during setup.
Sending Rules
Sending rules allow you to define what should happen to specific content when it is send from EBA Next to mail.
How to Set Up Sending Rules
- Open the EBA Next Admin interface.
- Navigate to Organisation → Exchange → Sending Rules.
- Click Add, and then select: Add
SMPT EMAIL EXCHANGE - Configure the rule
Name: Define a clear and descriptive name for the rule.
Settings
- Receiver email list: Enter one or more recipient email addresses. If you’re using a script or query, leave this field empty — it will be populated dynamically.
- Message subject: Define the subject line of the email.
- Message body: Enter the content of the email message.
- Sender email from: Select the sender from a predefined list of email accounts.
- Sender email: If you’ve selected Manual in the previous field, enter the sender’s email address manually.
- Reply to email: Enter an address if you want the recipient to reply to a different address than the one used for sending.
- Delivery notification: Enable this if you want to receive a confirmation that the recipient has received the message.
- Don’t send attachments: Enable this option if you don’t want to send document attachments. In EBA, the document created in the Next is treated as an attachment.
- Attachment order: Define the order in which attachments are sent.
- Zip all attachments: Enable this to compress all attachments into a single
.zipfile before sending.
Dynamic Content in Subject and Body
You can use mapped placeholders in the subject and body to insert dynamic data directly from the document.
Example:
$(InvoiceNumber) — Inserts the invoice number
Partner
- Unknown Partner: Use this if the partner is not known or you don’t maintain a partner list.
- Choose Partner: Select from a predefined list of partners.
- Script: Write a custom script to dynamically select the partner.
- Query: Provide a query to fetch the partner from an external database.
Additional Settings
-
Data Format:
Select this if the content is an e-invoice and choose the appropriate data format/catalog. -
Sign outgoing data
Select your certificate to digitally sign data.
Setup Test Environment
1. Overview
This quick guide shows how to setup environment for testing EBA Next System.
2. Prerequisites
- Windows or Linux PC
- 2 databases. You can use PostgreSQL for testing.
- SSL certificate. You can create it using our guide here.
- EBA Next installers can be downloaded here.
3. Step-by-step guide
3.1 Database preparation
- Prepare 2 databases - name them accordingly for their purpose - for example: next_config and next_content
- Prepare sql user with rw permissions on those databases you have already prepared.
3.2 Install EBA Next
- Run EBA Next Server installer. Use guides from chapter “Install Guides” according to your operating system.
- Run EBA Next Edge Apps installer. Choose Next Admin in installer. Help with “Install Guides” chapter on how to install Next Edge Apps.
3.3 Next services setup
3.4 Company registration
1. Overview
!!Do not use this solution in production!!
In this guide we will show you how you can generate SSL certificate for testing purposes. Benefit of using own SSL certificate for testing is quick deployment.
However there are downsizes also as you must copy Certificate Authority certificate (which you will create) onto each device you will use for testing.
2. Prerequisites
- OpenSSL installed
2.1 Install OpenSSL on Windows
We recommend that you install GIT on your Windows machine and use the GIT Bash to create SSL certificate.
2.2 Install on other systems
Most Linux distros have OpenSSL preinstalled. Mac OS also comes with preinstalled OpenSSL.
3. Step-by-step guide
Open CLI and navigate to folder where you want to store certificates. In this guide we will use C:\eba_share\certs.
3.1 Create your own Certificate Authority (CA)
3.1.1 Generate the CA private key
Open GIT Bash if you are on Windows machine and enter command (if you are on Linux or MacOS just open terminal): openssl genrsa -out ca.key 4096
This generates private key of your CA root certificate.
3.1.2 Create the CA root certificate
openssl req -x509 -new -nodes -key ca.key -sha256 -days 3650 -out CA.crt
In this example we have set -days 3650 which means that this CA root certificate will be valid 10 years.
3.2 Create the server private key
openssl genrsa -out server.key 2048
3.3 Create the Certificate Signing Request (CSR)
openssl req -new -newkey rsa:2048 -nodes -keyout server.key -out yourdomain.csr \
-subj "/C=XX/ST=YourState/L=YourCity/O=YourOrganization/CN=yourdomain.com" \
-addext "subjectAltName = DNS:yourdomain.com"
NOTE:
Edit -subj values according to your case:
- C=country shortcode (optional)
- ST=state shortcode (optional)
- L=city (optional)
- O=your organization title (optional)
- CN=your domain !!important!!
Add Subject Alternative Name (SAN) to your certificate:
-addext "subjectAltName = DNS:yourdomain.com"
3.4 Create a server certificate signed by your CA
openssl x509 -req -in yourdomain.csr -CA CA.crt -CAkey ca.key -CAcreateserial \
-out yourdomain.crt -days 3650 -sha256 \
-extfile <(printf "subjectAltName=DNS:yourdomain.com")
3.5 Convert .crt to p12 format
Create a .P12 certificate which you will then use to insert into EBA mobile service. Run this command:
openssl pkcs12 -export -in yourdomain.crt -inkey yourdomain.key -out SSL_yourdomain.p12 -name "yourdomain.com"
4. Establish EBA Mobile service connection
After you have successfully generated your own SSL certificate you must insert it into EBA Next mobile service. Follow procedure on install guide.
5. Deploy CA root certificate to devices
Each device that will access your test system must have root CA certificate which you have created in step 1 installed on their operating system.
Most modern web browsers accepts local computer’s trust policy. Search for help on how to install root CA certificate in your browser.
Share portal Setup
Setting Up EBA Next Share Portal
1. What is Share Portal?
The Share Portal is a feature of EBA Next that allows users to securely share content with external recipients (outside the organization). Recipients can view, review, or sign the shared content via a dedicated web interface.
2. How to Set Up Share Portal
Step 1: Configure Mobile Service
Locate the configuration file:
ebamobileservice.ini
Define the mobile server address:
mobileServer = https://SERVER_IP:PORT
After updating the configuration, restart the ebamobileservice.
Step 2: Configure Email Accounts (Notifications System)
In EBA Next Admin → Notifications System, configure the following:
-
Account for password delivery
This account is used to generate and send passwords to users.
➤ Set this account as the default account -
Sender account
This account is used to send emails containing the Share Portal link to recipients
Step 3: Customize Share Portal
In EBA Next Admin → Organization → Share Portal → Customization, you can configure:
- Background colors
- Logo
- Text color
- Other visual elements
3. How to Use Share Portal
- Open the EBA Next web application
- Select a document/content
- Under Actions, choose “Share”
⚠️ Note: You must have appropriate permissions for the selected content.
Share Configuration Window
In the popup window, define:
- Sender account
- Recipient email address
- Subject
- Message body
Share Type Options:
- One-time access
- Time-limited access (recipient can access content until the defined date)
After confirming by clicking OK, a notification will appear indicating that the content was successfully shared.
4. How the Recipient Uses Share Portal
- The recipient receives an email with a link to the Share Portal
- Clicking the link opens the Share Portal login page
Login Process
- The user enters their email address
- After clicking Sign In, a generated password is sent to their email
- The user logs in using this password
Accessing Shared Content
After successful login, the user can view all content that has been shared with them.
Summary
The Share Portal enables secure external collaboration by:
- Sending protected access links
- Using email-based authentication
- Allowing controlled (time-limited or one-time) access to documents